VLC
(→Simple instructions) |
(wikify slightly) |
||
| (5 intermediate revisions not shown) | |||
| Line 1: | Line 1: | ||
| - | |||
| - | |||
[http://videolan.org/vlc VLC] is a codec-less media player, capable of many useful multimedia functions. This article will focus on its streaming capabilities. | [http://videolan.org/vlc VLC] is a codec-less media player, capable of many useful multimedia functions. This article will focus on its streaming capabilities. | ||
| - | = Why VLC? = | + | == Why VLC? == |
| - | Because the VLC paradigm involves no codecs, and very little user interaction needed, it is considered optimal for this task. It packs a 13- | + | Because the VLC paradigm involves no codecs, and very little user interaction needed, it is considered optimal for this task. It packs a 13-30 megabyte footprint on the host machine (depending on OS). It is also able to transcode your video/audio files for saving onto devices such as the [[Nokia N800]]. It's ability to stream live content, as well as most video/audio formats makes it ideal for the mobile device's needs. |
| - | = Simple instructions = | + | == Simple instructions == |
First, download the software "VLC" from [http://videolan.org/vlc http://videolan.org/vlc] for your OS, and install it normally. | First, download the software "VLC" from [http://videolan.org/vlc http://videolan.org/vlc] for your OS, and install it normally. | ||
| Line 17: | Line 15: | ||
Choose your desired media file in that window, making sure that "advanced options" is not set (this ticks off VLC on Windows Vista x64, unverified on other OSes). | Choose your desired media file in that window, making sure that "advanced options" is not set (this ticks off VLC on Windows Vista x64, unverified on other OSes). | ||
| - | = Stream Output Settings= | + | === Stream Output Settings === |
| - | [[Image:Stream_output_window.jpg]] | + | |
| + | [[Image:Stream_output_window.jpg|frame|center|alt=Screenshot of the stream output settings dialog|Stream output settings]] | ||
In the stream output window you can see the options for your stream. The small red square marked off on "play locally" is your choice whether to set that or not. Leaving it off may improve performance. The highlighted rectangle area shows the HTTP server settings. VLC comes with an httpd server built-in, so you don't have to install any additional software. You want to set the "IP Address" to the IP address of the machine VLC is running on (in the example, 192.168.1.2). You may set the port to whatever legal port you wish. Select "Custom" in the drop down menu of the next section. | In the stream output window you can see the options for your stream. The small red square marked off on "play locally" is your choice whether to set that or not. Leaving it off may improve performance. The highlighted rectangle area shows the HTTP server settings. VLC comes with an httpd server built-in, so you don't have to install any additional software. You want to set the "IP Address" to the IP address of the machine VLC is running on (in the example, 192.168.1.2). You may set the port to whatever legal port you wish. Select "Custom" in the drop down menu of the next section. | ||
| + | === Encapsulation Settings === | ||
| - | + | [[Image:VLC-Encapsulation.jpg|frame|center|alt=Screenshot of encapsulation settings tab|Encapsulation settings]] | |
| - | [[Image:VLC-Encapsulation.jpg]] | + | |
Radio button labeled "MPEG-TS" should be selected. | Radio button labeled "MPEG-TS" should be selected. | ||
| - | == Video Codec Settings == | + | === Video Codec Settings === |
| - | [[Image:VLC-video-codec.jpg]] | + | |
| + | [[Image:VLC-video-codec.jpg|frame|center|alt=Screenshot of video codec settings tab|Video codec settings]] | ||
Ensure that the "Video" checkbox is checked. Under "Codec" drop-down menu, select "MPEG-2"; for bitrate, select 500 kb/s; for scale, pick 0.5. | Ensure that the "Video" checkbox is checked. Under "Codec" drop-down menu, select "MPEG-2"; for bitrate, select 500 kb/s; for scale, pick 0.5. | ||
| + | |||
These settings are explicit to the video you are trying to stream. Larger format video files (720p/1080p blu-ray movies, etc) may need some tinkering, as the 0.5 Scale setting may be too large to stream without dropped frames. For these, try 0.25. For smaller videos, you may want to try setting scale to 0.75 or even 1. | These settings are explicit to the video you are trying to stream. Larger format video files (720p/1080p blu-ray movies, etc) may need some tinkering, as the 0.5 Scale setting may be too large to stream without dropped frames. For these, try 0.25. For smaller videos, you may want to try setting scale to 0.75 or even 1. | ||
| + | |||
The bitrate setting is dependent on your network environment. 1000 kb/s = 1 megabit, roughly. Wireless-B technology should be able to stream 1 megabit throughout the average home, although you may find that you have to decrease this number to prevent framerate drop with larger format video files. 500 kb/s is about average for a clean-looking video stream, and most wifi networks will support this without issue. | The bitrate setting is dependent on your network environment. 1000 kb/s = 1 megabit, roughly. Wireless-B technology should be able to stream 1 megabit throughout the average home, although you may find that you have to decrease this number to prevent framerate drop with larger format video files. 500 kb/s is about average for a clean-looking video stream, and most wifi networks will support this without issue. | ||
| + | |||
Other Codecs to try are H264 - when you're transcoding from an existing h/x264(3) source; and MPEG-4 if your file is an mp4 or m4v file to begin with. The other settings should remain the same, following the guidelines in this section. | Other Codecs to try are H264 - when you're transcoding from an existing h/x264(3) source; and MPEG-4 if your file is an mp4 or m4v file to begin with. The other settings should remain the same, following the guidelines in this section. | ||
| - | == Audio Codec Settings == | + | === Audio Codec Settings === |
| - | [[Image:VLC-audio-codec.jpg]] | + | |
| + | [[Image:VLC-audio-codec.jpg|frame|center|alt=Screenshot of audio codec settings tab|Audio codec settings]] | ||
Ensure that the "Audio" checkbox is checked. In the Codec dropdown, choose "MPEG Audio"; for bitrate, choose "128 kb/s"; for channels, choose "2". | Ensure that the "Audio" checkbox is checked. In the Codec dropdown, choose "MPEG Audio"; for bitrate, choose "128 kb/s"; for channels, choose "2". | ||
| Line 46: | Line 50: | ||
The 2 channel setting is self-evident. Two speakers, two audio channels. | The 2 channel setting is self-evident. Two speakers, two audio channels. | ||
| - | == The "lazy" copy and paste == | + | === The "lazy" copy and paste === |
| + | |||
If you're in a hurry, or don't want to tinker, here are the settings to paste into the very bottom of the window. First, clear the line from :sout to the last character, and delete it. then, paste in this snippet: | If you're in a hurry, or don't want to tinker, here are the settings to paste into the very bottom of the window. First, clear the line from :sout to the last character, and delete it. then, paste in this snippet: | ||
| - | <nowiki>:sout=#transcode{vcodec=mp2v,vb=500,scale=0.5,acodec=mpga,ab=128,channels=2}:duplicate{dst=std{access=http,mux=ts,dst=</nowiki>'''192.168.1.2:8080'''}} | + | <nowiki>:sout=#transcode{vcodec=mp2v,vb=500,scale=0.5,acodec=mpga,ab=128,channels=2}:duplicate{dst=std{access=http,mux=ts,dst=</nowiki>'''192.168.1.2:8080'''}} |
Making sure to change the '''bold text''' in that line to your computer's IP address and port you wish to use. Hit stream and be on your way! | Making sure to change the '''bold text''' in that line to your computer's IP address and port you wish to use. Hit stream and be on your way! | ||
| - | = On your N8x0 device: settings/apps = | + | == On your N8x0 device: settings/apps == |
| - | On the | + | On the device you will need "mplayer"; you can get this from the application manager. This also installs GMPlayer, which is a loader for mplayer which we will not be using here. |
| - | == Using the Terminal == | + | === Using the Terminal === |
Open a terminal window by tapping menu, utilities, and then scrolling to the X Terminal application - tapping it once. | Open a terminal window by tapping menu, utilities, and then scrolling to the X Terminal application - tapping it once. | ||
Once the terminal is open, tap inside it to bring up your keypad, and type the following: | Once the terminal is open, tap inside it to bring up your keypad, and type the following: | ||
| - | mplayer http://'''192.168.1.2:8080''' -cache 8192 | + | mplayer http://'''192.168.1.2:8080''' -cache 8192 |
where the '''192.168.1.2:8080''' is the VLC stream's IP address and port you set in the previous steps. | where the '''192.168.1.2:8080''' is the VLC stream's IP address and port you set in the previous steps. | ||
| Line 70: | Line 75: | ||
Closing the video window will bring you back to the terminal; you can either run mplayer again, or close this window now. | Closing the video window will bring you back to the terminal; you can either run mplayer again, or close this window now. | ||
| + | |||
| + | [[Category:Software]] | ||
| + | [[Category:Media]] | ||
Latest revision as of 12:37, 28 January 2011
VLC is a codec-less media player, capable of many useful multimedia functions. This article will focus on its streaming capabilities.
Contents |
[edit] Why VLC?
Because the VLC paradigm involves no codecs, and very little user interaction needed, it is considered optimal for this task. It packs a 13-30 megabyte footprint on the host machine (depending on OS). It is also able to transcode your video/audio files for saving onto devices such as the Nokia N800. It's ability to stream live content, as well as most video/audio formats makes it ideal for the mobile device's needs.
[edit] Simple instructions
First, download the software "VLC" from http://videolan.org/vlc for your OS, and install it normally.
Second, start the software, and regularly open the file you wish to stream. This is to ensure that VLC will play the file back with no errors. In the tools menu, select "Messages", and set the verbosity to 1 or 2, instead of 0. This will allow you to see any codec/streaming errors in real time.
Next, stop playback - and go to the "Media" menu, and select "Streaming"
Choose your desired media file in that window, making sure that "advanced options" is not set (this ticks off VLC on Windows Vista x64, unverified on other OSes).
[edit] Stream Output Settings
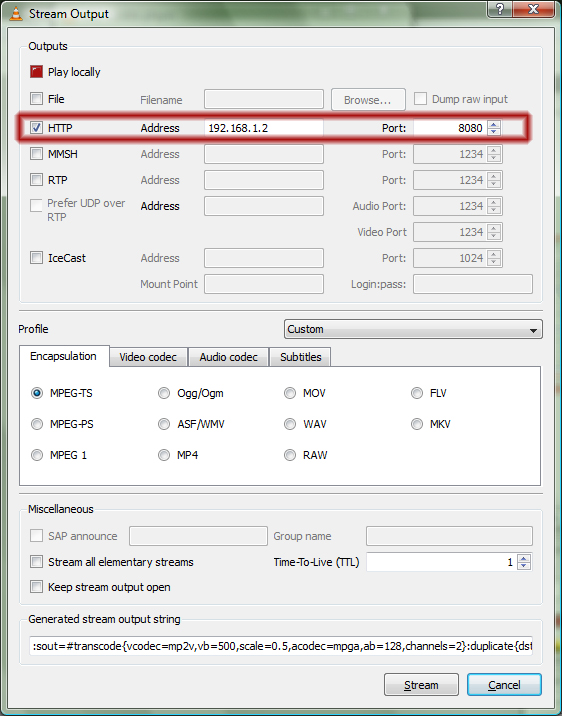
In the stream output window you can see the options for your stream. The small red square marked off on "play locally" is your choice whether to set that or not. Leaving it off may improve performance. The highlighted rectangle area shows the HTTP server settings. VLC comes with an httpd server built-in, so you don't have to install any additional software. You want to set the "IP Address" to the IP address of the machine VLC is running on (in the example, 192.168.1.2). You may set the port to whatever legal port you wish. Select "Custom" in the drop down menu of the next section.
[edit] Encapsulation Settings
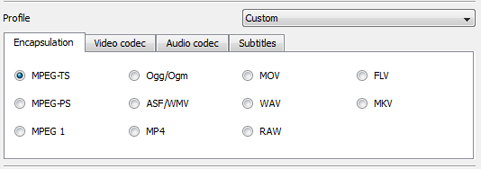
Radio button labeled "MPEG-TS" should be selected.
[edit] Video Codec Settings
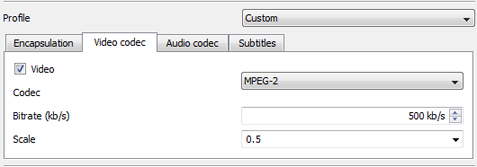
Ensure that the "Video" checkbox is checked. Under "Codec" drop-down menu, select "MPEG-2"; for bitrate, select 500 kb/s; for scale, pick 0.5.
These settings are explicit to the video you are trying to stream. Larger format video files (720p/1080p blu-ray movies, etc) may need some tinkering, as the 0.5 Scale setting may be too large to stream without dropped frames. For these, try 0.25. For smaller videos, you may want to try setting scale to 0.75 or even 1.
The bitrate setting is dependent on your network environment. 1000 kb/s = 1 megabit, roughly. Wireless-B technology should be able to stream 1 megabit throughout the average home, although you may find that you have to decrease this number to prevent framerate drop with larger format video files. 500 kb/s is about average for a clean-looking video stream, and most wifi networks will support this without issue.
Other Codecs to try are H264 - when you're transcoding from an existing h/x264(3) source; and MPEG-4 if your file is an mp4 or m4v file to begin with. The other settings should remain the same, following the guidelines in this section.
[edit] Audio Codec Settings
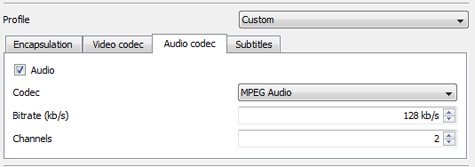
Ensure that the "Audio" checkbox is checked. In the Codec dropdown, choose "MPEG Audio"; for bitrate, choose "128 kb/s"; for channels, choose "2". This took some tinkering. MP3 is of course the standard audio format for most encoded video, however, without a lengthy discussion on why the mp3 format isn't easily transcoded without additional software on the computer - you should choose MPEG Audio. This guarantees that the audio of your file will get transcoded and streamed properly.
If you are trying to stream a video that has audio that needs to be higher quality, change the bitrate to 320 kb/s, or any multiple of 16 in the range.
The 2 channel setting is self-evident. Two speakers, two audio channels.
[edit] The "lazy" copy and paste
If you're in a hurry, or don't want to tinker, here are the settings to paste into the very bottom of the window. First, clear the line from :sout to the last character, and delete it. then, paste in this snippet:
:sout=#transcode{vcodec=mp2v,vb=500,scale=0.5,acodec=mpga,ab=128,channels=2}:duplicate{dst=std{access=http,mux=ts,dst=192.168.1.2:8080}}
Making sure to change the bold text in that line to your computer's IP address and port you wish to use. Hit stream and be on your way!
[edit] On your N8x0 device: settings/apps
On the device you will need "mplayer"; you can get this from the application manager. This also installs GMPlayer, which is a loader for mplayer which we will not be using here.
[edit] Using the Terminal
Open a terminal window by tapping menu, utilities, and then scrolling to the X Terminal application - tapping it once.
Once the terminal is open, tap inside it to bring up your keypad, and type the following:
mplayer http://192.168.1.2:8080 -cache 8192
where the 192.168.1.2:8080 is the VLC stream's IP address and port you set in the previous steps.
Press the carriage return button on the keypad to execute the command - the terminal window will scroll a bunch of text, and with any luck, should say "Cache fill: " on a line, and then "TS file format detected"
Simply wait for mplayer to bring up the video window (this can take several seconds to half a minute, depending on the stream and available CPU/RAM on the device) - and watch away!
Closing the video window will bring you back to the terminal; you can either run mplayer again, or close this window now.
- This page was last modified on 28 January 2011, at 12:37.
- This page has been accessed 39,936 times.


